Module Map
The Module Map is the visual workspace where you design the branching structure of a Module.
Key Areas
16 min read
Module Map
The Module Map is the visual workspace where you design the branching structure of a Module.
Before You Begin
You access the Module Map from within a Module. See Modules for how to create and navigate to a Module.
Overview
Traditional eLearning design tends to start with a linear document: a storyboard that moves the learner from screen to screen in a fixed sequence. The Module Map offers a different approach. Instead of writing a document, you build a map.
Each Scene in your Module appears on the canvas as a card. You arrange those cards, draw connections between them, and define the paths a learner can take depending on how they respond to the learning content you present. The result is a living diagram of your learning strategy that you can read at a glance, rearrange in seconds, and hand to a colleague who will immediately understand what you have designed.
This is the agile mind-map approach to adaptive learning design. You are not writing a script; you are sketching a system. The map keeps the big picture visible at all times, so you can make structural decisions quickly, spot gaps or dead ends in the learner journey before you have written a word of content, and iterate the shape of the experience without touching the scenes themselves.
The Module Map does not replace content authoring. It sits above it. Once your map makes sense, you open plan individual Scenes then design the activities, assessments, and experiences that live inside them.
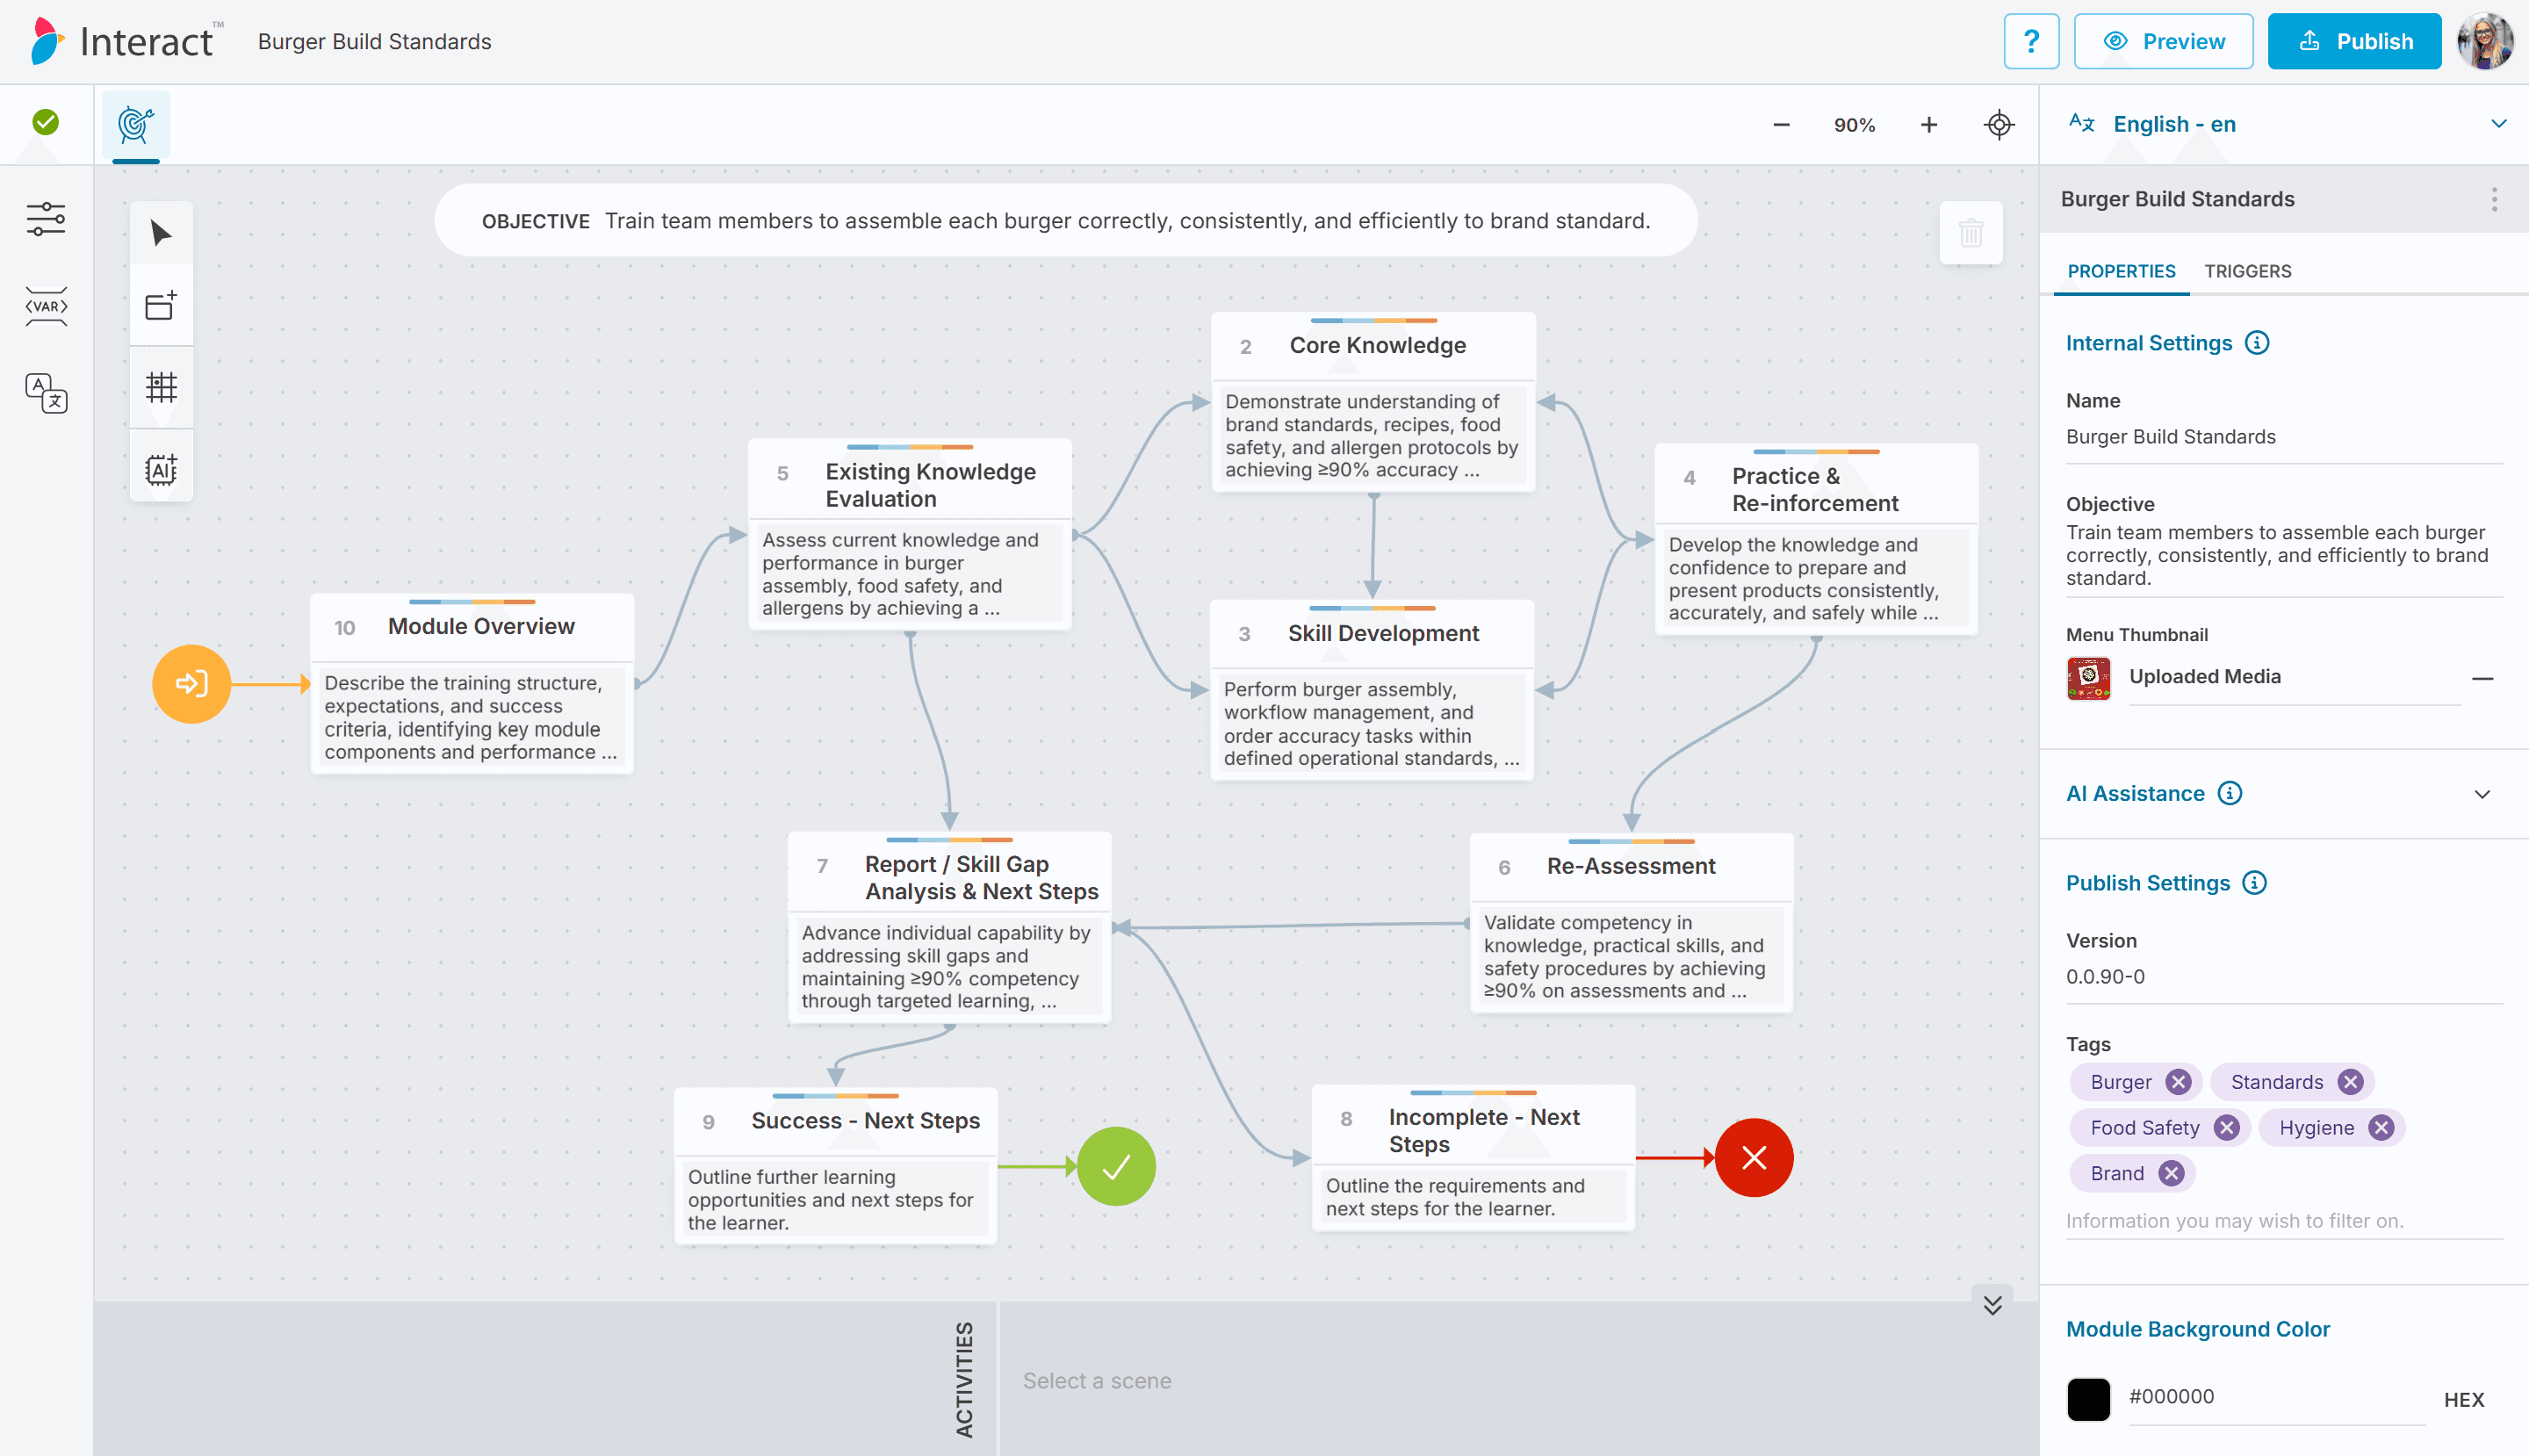
Module Map canvas showing several scenes connected by response paths
Understanding the Module Map
Scenes
Each card on the Module Map represents a Scene. A Scene is the unit of learning in Interact: a topic, a question set, a decision point, a feedback moment. On the map, a Scene shows its name and, depending on the current view, either its learning objective or its outgoing Response paths.
Scenes are free to place anywhere on the canvas. You can drag them into any arrangement that makes the flow legible: left-to-right, top-to-bottom, radial, or freeform. The layout has no effect on learner experience; it only affects how easy the map is to read and work with.
Connections
Connections represent the paths a learner can take from one Scene to the next. They are drawn from a Scene's Response paths, which determine where a learner goes based on what they did in the Scene's activities. A Scene with two possible outcomes will have two outgoing connections leading to two different destination Scenes.
The pattern of connections is what makes a Module adaptive. A learner who answers correctly might go to an advanced Scene. A learner who struggles might loop back to a foundational one, or be routed to a remediation path. You can see all of this on the map at once.
Scene Types
Four types of Scene are possible, indicated visually on the card:
Type | What it means |
|---|---|
Start | The entry point for the Module. There is one Start Scene per Module, and every learner begins here. |
Good End | A successful terminal Scene. Reaching this Scene means the learner completed the Module with a positive outcome. |
Bad End | An unsuccessful terminal Scene. Reaching this Scene means the learner did not reach the desired outcome. |
Standard | Any Scene that is not an entry or terminal point. Most Scenes are standard transitional scenes. |
A well-designed map typically has one Start, at least one Good End, and often one or more Bad End or remedial endpoint Scenes, with a branching network in between.
Card Faces: Objectives and Responses
Each Scene card has two faces, and you can flip between them either for a single card or for all cards at once.
The Objectives face shows the Scene's learning objective: what the learner is supposed to know or be able to do after completing the Scene. This is the authoring view for reviewing content intent.
The Responses face shows the Scene's outgoing connections: the exit paths leading to other Scenes. This is the authoring view for reviewing flow logic.
Switching between the two faces lets you shift your attention between "what does this Scene teach?" and "where does this Scene lead?"
Expanded and Collapsed Cards
Scene cards can be expanded or collapsed. An expanded card shows the Scene's content (objective or responses). A collapsed card reduces to a small circle marked with the Scene's reference number. Collapsing cards you are not currently working on makes it easier to read the overall structure of a large or complex Module.
Designing for Adaptive Learning
The Module Map is where you work out your adaptive strategy before you spend time writing any content. A useful design habit is to start with only the structural skeleton: place your Start and End Scenes first, then fill in the middle, asking at each step "how might learners respond?" and "what determines the different path?"
Consider the shape of your map:
A straight line from Start to Good End with no branches is not adaptive. It is linear eLearning.
A map where every wrong answer leads to Bad End is technically branching, but offers learners no recovery path.
A map where different levels of knowledge are confirmed or challenged as the learner progresses, with routes that converge on the same Good End, is a genuinely adaptive experience.
The map makes all of these shapes visible and comparable. You can redesign the shape of the experience in minutes on the canvas before investing hours authoring the scenes.
Designing with Stakeholders and Subject Matter Experts
One of the most useful things about the Module Map is how quickly it lets you work. Adding a scene takes a single click. Moving one takes a drag. Drawing a connection takes two clicks. That speed makes the map practical in a live session, not just as a solo authoring tool.
When you are in a meeting with a subject matter expert, a training manager, or a group of stakeholders discussing what a Module should teach, you are also gathering everything you need to build the map: organisation need, topics, knowledge gaps, consequences of getting things wrong, and the shape of a successful learning journey. Rather than taking notes and building the map later, you can build it during the conversation. By the end of the session, you have a working structural draft instead of a page of bullet points.
This approach works particularly well for:
Discovery sessions where you are extracting scope, topics, and learning requirements from someone with deep domain knowledge
Stakeholder reviews where you need to show the shape of the experience quickly and get feedback while everyone is in the room
Training team workshops where multiple designers are aligning on the strategy before authoring begins
Iterative design where you return to the map in follow-up sessions to refine the structure as understanding deepens
The map gives stakeholders something to react to, which tends to surface better feedback than abstract discussions. Showing a SME a diagram of their subject domain structured as a learning journey often prompts them to say things like "no, that topic needs to come earlier" or "there should be a path for someone who already knows this", which are insights that are hard to surface from a blank discussion.
Example Workflow: A Discovery Session
The following describes a typical workflow for a discovery session with a subject matter expert.
Before the session: Create a new Module and navigate to the Module Map. You start with a blank canvas.
During the session:
As the SME describes the topics learners need to cover, press C to enter Create Scene mode and click the canvas to place a scene for each one. Name each scene as you go using Edit Scene Details on the card. You do not need to be precise; these are working labels.
Ask the SME what a learner needs to demonstrate to show they have understood each topic. Type this into the scene as the learning objective. Now your map is not just a list of topics; it is a map of intended outcomes.
Ask "what happens if a learner does not know this?" and "what does getting it wrong look like?" These questions reveal the branching structure. Add scenes for remediation paths, decision points, or alternative routes as they emerge.
Use Connect Scenes to draw connections between scenes as the conversation reveals how they relate. Move scenes around the canvas so the flow reads naturally. The layout does not need to be perfect; it needs to communicate the structure clearly enough to keep the conversation going.
As the shape settles, identify the Start scene, the Good End scene, and any Bad End or remedial endpoints. Drag them into a spatial arrangement that makes the journey legible.
At the end of the session: You have a working structural draft of the Module. Share your screen and walk through the map with the SME to confirm the structure reflects what was discussed. Adjust any scenes that are out of place. This takes a few minutes and produces a validated foundation you can build from immediately.
What would otherwise take days of note-processing and storyboard drafting is now ready before the meeting ends.
AI as a Thinking Partner
The Module Map includes an AI assistant that can suggest Scene cards based on your Module's learning objective. This is useful both before a session, to seed your initial thinking, and after one, to check whether important topics have been missed.
To use it, click Suggest Scene Cards in the toolbar. The AI generates a set of proposed scenes which appear on the canvas clearly tagged as AI-generated. They look visually distinct from scenes you have created yourself, so there is no ambiguity about what came from the AI and what came from your design work or your session with the SME.
From there, full control stays with you. Review each suggestion on its merits. Accept the ones that fit your strategy by clicking Accept on the card. Discard the ones that do not with Discard. If you want to act on everything at once, Accept All and Discard All are available in the toolbar when AI-generated scenes are present.
The result is that AI can contribute ideas without replacing judgment. A suggestion that does not match the nuances you heard in a discovery session gets discarded. One that fills a genuine gap in your map gets accepted and becomes part of your design.
Note: For full documentation on AI features in Interact, including how scene suggestions work and how to get the best results, see the AI section of the documentation.
The Module Map Interface
The Canvas
The canvas is a large scrollable workspace. You can pan across it and zoom in and out freely. Scene cards are placed directly on the canvas and can be dragged to any position.
When a Scene approaches the edge of the canvas area, a visual indicator appears to warn that it is near the boundary. The canvas is large enough to accommodate complex Modules with many Scenes.
Toolbar
The toolbar runs vertically on the left side of the canvas. It controls the active cursor mode and the global state of Scene cards.
Tool | Shortcut | Description |
|---|---|---|
Select | S | The default mode. Click a Scene to select it. |
Create Scene | C | Click anywhere on the canvas to place a new Scene at that position. |
Snap To Grid | G | Toggle snap-to-grid placement. When active, dragged Scenes snap to a grid rather than moving freely. |
Collapse Scene / Expand Scene | Collapse or expand all Scenes at once. The button toggles between the two states each time you click. | |
Objectives / Responses | Flip all Scene cards to show their Objectives face or their Responses face. The button reflects the current state. | |
Connect Scenes | Activate the connection drawing tool to manually draw a connection between two Scenes. | |
Suggest Scene Cards | Open the AI assistant to generate Scene suggestions for this Module. | |
Accept All | Accept all AI-generated Scene suggestions into the Module. Only visible when AI-generated Scenes are present. | |
Discard All | Remove all AI-generated Scene suggestions. Only visible when AI-generated Scenes are present. |
Scene Card Actions
When you hover over a Scene card, a small action bar appears above it. These actions apply to the individual Scene.
Action | Shortcut | Description |
|---|---|---|
Show Scene Responses / Show Scene Details | Z | Flip this Scene card between the Responses face and the Objectives face. |
Expand Scene Node / Collapse Scene Node | Toggle whether this Scene card is expanded or collapsed. | |
Edit Scene Details | Open the Scene's name and objective for inline editing without leaving the map. | |
Open Scene | Open the Scene in full editing mode to author its activities and groups. | |
Accept | Accept this AI-generated Scene (green). Only shown for AI-generated Scenes. | |
Discard | Remove this AI-generated Scene (red). Only shown for AI-generated Scenes. |
View Bar
The view bar runs along the top of the canvas and contains display toggles and zoom controls.
Control | Description |
|---|---|
Show / Hide Learning Objective | Toggle the Module-level learning objective display at the top of the map. |
Data Analysis | Overlay usage analytics on the map, showing learner engagement data on connections and Scenes. |
Zoom controls | Zoom in, zoom out, and reset zoom to fit the canvas to the window. |
Navigating the Canvas
The Module Map is a spatial workspace. Learning to move around it quickly matters when your Module grows to dozens of Scenes.
Panning
Move across the canvas by holding Middle Mouse Button and dragging. You can also press and hold Space at any time to temporarily switch to the hand cursor and drag to pan, then release Space to return to your previous mode.
For dedicated pan mode, press H to switch to the hand cursor. Drag to move around the canvas freely. Press S or Esc to return to select mode.
Zooming
Use the + and - zoom buttons in the view bar to step in and out. To reset to a full-canvas view, use the reset button or press Ctrl+0.
For keyboard zoom:
Keys | Action |
|---|---|
Ctrl + + (or Ctrl + =) | Zoom in |
Ctrl + - | Zoom out |
Ctrl + 0 | Reset zoom to fit |
Keyboard Shortcuts
Key | Action |
|---|---|
S | Switch to Select cursor |
H | Switch to Hand cursor (pan mode) |
Space (hold) | Temporarily switch to Hand cursor for panning |
C | Switch to Create Scene cursor |
Esc | Return to Select cursor from any mode |
G | Toggle Snap To Grid |
Z | Flip the selected Scene card between Objectives and Responses faces |
Shift (hold) | While drawing a connection, create a new Scene at the end of the connector |
Ctrl+Shift (hold) | While hovering a connection, remove it |
Ctrl + + | Zoom in |
Ctrl + - | Zoom out |
Ctrl + 0 | Reset zoom |
Ctrl + Z | Undo |
Ctrl + Y | Redo |
Common Tasks
Adding a Scene to the Map
Press C or click Create Scene in the toolbar to switch to scene creation mode. The cursor changes to indicate you are in this mode.
Click anywhere on the canvas to place a new Scene at that position.
Press Esc or S to return to select mode.
Moving a Scene
With Select mode active, click a Scene card to select it.
Drag it to a new position on the canvas.
If Snap To Grid is active, the Scene snaps to the nearest grid position as you drag. Press G to toggle snap on or off.
Opening a Scene for Editing
Hover over the Scene card until the action bar appears, then click Open Scene. This takes you into the Scene's editing view where you can build activities, add groups, and configure navigation.
To return to the Module Map, use the breadcrumb navigation at the top of the page.
Editing a Scene's Name or Objective Inline
Hover over the Scene card until the action bar appears, then click Edit Scene Details. The Scene card enters inline editing mode and you can update the name and learning objective without leaving the map.
Click elsewhere on the canvas to confirm and exit editing mode.
Flipping Between Objectives and Responses
To flip a single card between its Objectives and Responses face, hover over it and press Z, or click Show Scene Responses / Show Scene Details in the card's action bar.
To flip all cards at once, click Objectives or Responses in the main toolbar. The button label reflects the face you will switch to.
Collapsing and Expanding Scenes
Collapsed Scenes are useful when you want to see the overall shape of the Module without the detail of each card getting in the way.
To collapse or expand a single Scene, use the collapse/expand button in the card's action bar.
To collapse or expand all Scenes at once, use the Collapse Scene / Expand Scene button in the main toolbar. Click it once to collapse all; click it again to expand all.
Undoing and Redoing Changes
Undo: Press Ctrl+Z (Cmd+Z on Mac) to reverse the last change to the map.
Redo: Press Ctrl+Y (Cmd+Y on Mac) to reapply a change you have undone.
Connecting Two Scenes
Click Connect Scenes in the toolbar to activate the connection tool.
Click the source Scene, then click the destination Scene. A connection is drawn between them.
Connections represent Response paths. For detailed control over connection logic, open the Scene and edit its Responses directly.